


In today's dynamic enterprise landscape, protecting sensitive data across distributed applications is paramount. YugabyteDB, a leading distributed SQL database known for its horizontal scalability and built-in resilience, empowers organizations to build globally consistent applications.
While YugabyteDB is built to seamlessly handle a number of failures, complete protection against extreme failures and evolving threats, and compliance and regulatory requirements, necessitates a dedicated data security and recovery solution. That's where Commvault Cloud comes in, providing unparalleled cyber resiliency to safeguard your critical data.
With our latest innovations, we’re excited to add support for YugabyteDB. With this integration, customers have complete protection of YugabyteDB environments, providing rapid recovery in the event of failures and logical corruptions across multiple regions. And the best part? You can easily manage and orchestrate your YugabyteDB workload right from the Commvault Cloud console.
Let's take a closer look at the key functionality the Commvault Cloud and YugabyteDB integration provides:
- Backup all namespaces in AWS and Azure: Configure full and incremental backups, schedule backups, and perform individual table-level backups of YCQL and individual database backups of YSQL.
- Browse and restore of namespaces: Easily restore individual databases and tables in-place to the original cluster or out-of-place to another cluster. Flexibility at your fingertips.
- Job monitoring and manageability: The Commvault Cloud console provides simple workflows to configure, manage and monitor the status of any backup or restore process.
Enhance Application Resilience with Commvault Cloud and YugabyteDB
When combined, Commvault Cloud and YugabyteDB help organizations build, modernize, and protect business-critical applications against evolving threats and failures. The solution offers a range of benefits, including:
Comprehensive protection: Safeguard your YugabyteDB deployments across AWS and Azure, including those leveraging stretch clusters across hyperscalers for geo-distributed replication.
- Automated self-healing: Reduce operational overhead with YugabyteDB's automatic cluster healing, allowing Commvault Cloud to restore to single storage or CSP (cloud service provider).
- Granular backup and restore: Protect both YSQL and YCQL applications within your YugabyteDB clusters.
- Centralized control and monitoring: Manage your entire YugabyteDB backup infrastructure from the Commvault Cloud console, streamlining job management and reporting.
- Long-term Retention: Fulfill compliance and regulatory requirements by providing a backup copy to low-tier storage with extended retention.
- Ultimate security: Protect your business-critical applications with encryption, layered security, and role-based authentication controls for advanced cyber resilience.
- Unmatched Resilience: Effortlessly manage access node failures without disrupting scheduled backups, ensuring the ability to resume backups even in the event of network failures.
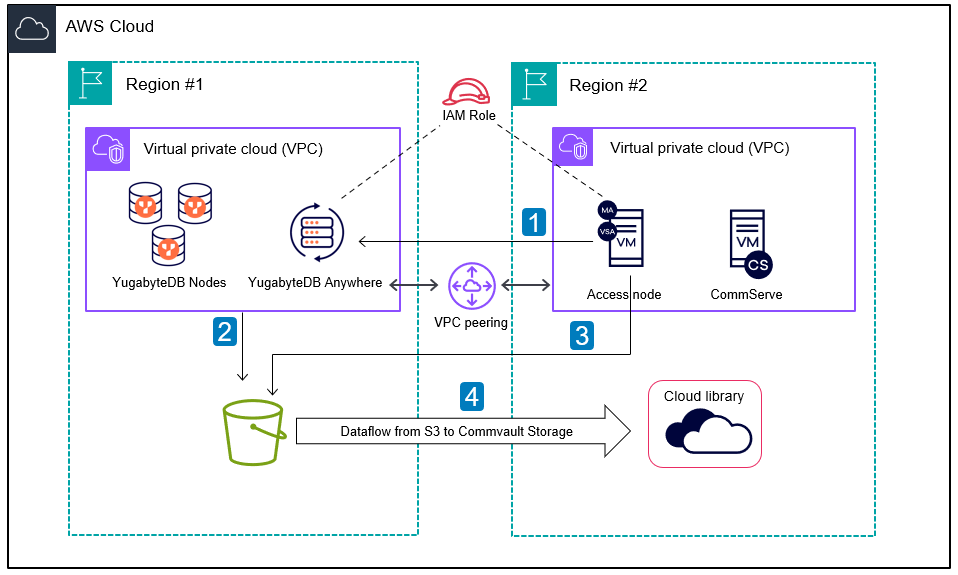
How to configure YugabyteDB
To configure a YugabyteDB cluster in the Commvault Cloud console, follow these steps:
- From the navigation pane, go to Protect > Big data.
- Go to the Big Data page and select “Add cluster” and choose YugabyteDB.
- If the access node is already configured, select it. Otherwise, click on the "+" to add a new access node.
- Choose the plan that suits your needs.
- Add YugabyteDB Anywhere node (Controlling node) with the User API token.
- Configure an intermediate storage. If you're configuring for a new storage, select either Amazon S3 or Microsoft Azure Storage.
- If you select Azure Storage, provide the User SAS token associate with the account. If you select Amazon S3, choose either IAM role or access and secret keys authentication.
- Select the database and keyspace contents that require protection.
- Review the summary and click finish. Once successful, the configured instance will be added to the instance list.
For more information, visit our Getting Started with YugabyteDB documentation.