Solved

Commvault - Send Logs automation with powershell

  • 4 October 2023
  • 7 replies
  • 140 views

Badge +3

Hi everyone,

I’m using powershell to automate the send logs file for a specific job in commvault. 


I want send these logs to a specific local path in the server, but according to the this documents Send-CVLogFile (commvault.com) the available option is to email. So my question is, there’s another way using powershell or other api to do this?


Thanks.


icon

Best answer by Brian Bruno 5 October 2023, 23:08

View original

7 replies

Userlevel 5
Badge +13

Hi @varsenia,


Thank you for your question!  It does look like that built-in Powershell module is intended for sending e-mails, and doesn’t have a parameter for saving logs to an output location.  I will suggest this as a potential enhancement to this function in a future release.


Although I don’t see a built-in API for doing this, I can offer a command line method that you can use inside your Powershell script.  I have attached an XML here that you can use as a template for this.


First, you’ll need to modify the values in the XML.  I have pre-populated with a lot of values.  Some of these you may want to modify ahead of time, and some others you will need to update dynamically as part of your Powershell script.  Any of the options you’d need to change will be in the <sendLogFileOption> element


          <sendLogFilesOption>
<saveToLogDir>/tmp</saveToLogDir>
<computersSelected>false</computersSelected>
<searchContentSelected>false</searchContentSelected>
<timeSelected>false</timeSelected>
<uploadLogsSelected>true</uploadLogsSelected>
<emailSelected>false</emailSelected>
<saveToFolderSelected>true</saveToFolderSelected>
<csDatabase>true</csDatabase>
<getLatestUpdates>true</getLatestUpdates>
<fingerPrint>true</fingerPrint>
<galaxyLogs>true</galaxyLogs>
<machineInformation>true</machineInformation>
<osLogs>true</osLogs>
<useDefaultUploadOption>true</useDefaultUploadOption>
<isNetworkPath>false</isNetworkPath>
<includeJobResults>false</includeJobResults>
<includeIndex>false</includeIndex>
<scrubLogFiles>false</scrubLogFiles>
<splitFileSizeMB>512</splitFileSizeMB>
<actionLogs>false</actionLogs>
<multiJobIds>134962</multiJobIds>
<collectHyperScale>false</collectHyperScale>
<enableChunking>true</enableChunking>
<allUsersProfile>true</allUsersProfile>
<collectUserAppLogs>true</collectUserAppLogs>
<collectRFC>false</collectRFC>
</sendLogFilesOption>


A few elements you might want to change and leave permanently :


SaveToLogDir -- I currently have this going to /tmp (as I ran this from a Linux system).  This is the output directory for where you want the sendLogFiles bundle to be written to on the CommServe.

csDatabase -- This is set to true, which specifies to collect the Commserv database.  Set this to false if you do not wish to include a database.

getLatestUpdates -- This goes along with csDatabase.  Setting this to true will perform a DR Backup first so that we collect the csDatabase as of that moment, and not the most reason DR Backup which could have been hours ago.  This element can be removed if you opt to set csDatabase to false.


Now I also have a job ID in here already from my lab, which is in <multiJobIds>.  This is something you’ll need to dynamically update each time your script runs, as this is the job ID it’s going to be collecting logs for.  If you’re unfamiliar with using Powershell to modify the contents of an XML file, you can follow this as an example :


https://victorleungtw.medium.com/replace-text-in-xml-files-with-powershell-504d3e37a058


Once the XML has been updated with all necessary changes, it can be executed by using the qoperation binary in our Base directory :

qoperation execute -af path\to\sendLogs.xml

For example if you’re running this on a Windows host and sendLogs.xml lives in C:\temp, your exact syntax would be :
 

qoperation execute -af c:\temp\sendLogs.xml


That would trigger the log file upload based on your job ID, and also output the bundle to the location designated by the <SaveToLogDir> element.


Please let me know if this is helpful.


-Brian Bruno

Badge +3

Hi @Brian Bruno ,

Thanks for your reply, I will try to apply these changes.


Badge +3

Hi @Brian Bruno,

The solution that you propose works fine, i can send logs to a local path. So thanks you

Now i wanna know, there’s a way to fragments log for the specific job only?


In the commcell i can do this for a finished job


Can i set this in the <sendLogFileOption> ?

Userlevel 5
Badge +13

Hi @varsenia,


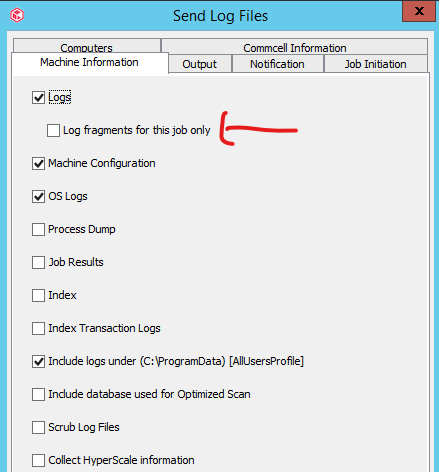
You sure can!  You can add the highlighted option under the <sendLogFileOption> element to only include those specific log fragments : 
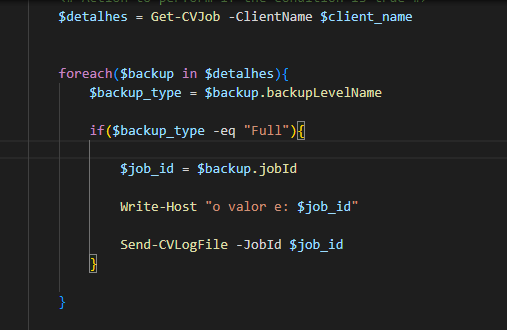
 

          <sendLogFilesOption>
            <saveToLogDir>/tmp</saveToLogDir>
            <computersSelected>false</computersSelected>
            <searchContentSelected>false</searchContentSelected>
            <timeSelected>false</timeSelected>
            <uploadLogsSelected>true</uploadLogsSelected>
            <emailSelected>false</emailSelected>
            <saveToFolderSelected>true</saveToFolderSelected>
            <fingerPrint>true</fingerPrint>
            <galaxyLogs>true</galaxyLogs>
            <logFragments>true</logFragments>
            <machineInformation>true</machineInformation>
 

Simply add that to the XML in the same position, and it should give you what you’re looking for.


Let me know if it doesn’t work, or you have any other questions!


-Brian Bruno

Badge +3

Hi @Brian Bruno 


Thank you very much, it’s working perfectly.


Can I have access to xml resources for other operation like backup and restore automation?


Userlevel 5
Badge +13

Hi @varsenia,


Absolutely!  You can actually generate these XML’s yourself using the Java Console.  The vast majority of operations in the UI have a ‘Save as script’ button, which is what I used to generate that XML.  When you use Save as Script, there will be 2 files created :


  1. A Batch (.bat) or Shell script (.sh) file (depending on whether or not you’re using a Windows or Linux Commserve) that performs the command line login to the CommServe, and executes the XML to perform the operation itself.
  2. The XML file that defines the actual operation you wish to run.


To generate the XML that I shared with you, I simply opened the Send Log Files window in the UI with all the options selected that I wanted, and then clicked the ‘Save as Script’ button at the bottom : 


Simply specify a location to save the scripts, and provide a file name with either the .bat or .sh extension. 


The same location will also automatically create the .XML file in the same file path.  


For example, if you wanted to get the XML to trigger a backup or a restore, you can use the same method by configuring that backup or restore the way you want in the UI, and you’ll find the same Save as Script button that you can leverage to obtain the underlying XML.  
 

Any of those XML’s that you create using this method can all be executed the same way : 
 

qoperation execute -af <Path\To\XML File>


This can be a powerful tool for getting the XML’s you need for automation.


-Brian Bruno

Badge +3

Hi @varsenia,


Absolutely!  You can actually generate these XML’s yourself using the Java Console.  The vast majority of operations in the UI have a ‘Save as script’ button, which is what I used to generate that XML.  When you use Save as Script, there will be 2 files created :


  1. A Batch (.bat) or Shell script (.sh) file (depending on whether or not you’re using a Windows or Linux Commserve) that performs the command line login to the CommServe, and executes the XML to perform the operation itself.
  2. The XML file that defines the actual operation you wish to run.


To generate the XML that I shared with you, I simply opened the Send Log Files window in the UI with all the options selected that I wanted, and then clicked the ‘Save as Script’ button at the bottom : 


Simply specify a location to save the scripts, and provide a file name with either the .bat or .sh extension. 


The same location will also automatically create the .XML file in the same file path.  


For example, if you wanted to get the XML to trigger a backup or a restore, you can use the same method by configuring that backup or restore the way you want in the UI, and you’ll find the same Save as Script button that you can leverage to obtain the underlying XML.  
 

Any of those XML’s that you create using this method can all be executed the same way : 
 

qoperation execute -af <Path\To\XML File>


This can be a powerful tool for getting the XML’s you need for automation.


-Brian Bruno


Hi @Brian Bruno,

Sorry for the delay, it works fine, so thank you for your time and support.

Reply