Solved

Permission Issues with Admin User in Commvault - I am admin user but I need authorize to delete

  • 2 October 2024
  • 3 replies
  • 309 views

Forum|alt.badge.img+5

Hello Commvault Community,

I recently installed Commvault in a test environment and am encountering an issue with administrative tasks.

I currently have only one profile available, which is the default admin account, and I do not have any other accounts. However, when attempting to delete clients, libraries, or storage policies, I receive a message stating that the request has been sent via email and will be processed once approved.

I have verified that my admin user account is configured as an administrator and has the appropriate roles and privileges. I would appreciate any guidance or solutions you could provide to help resolve this issue.

Thank you in advance for your assistance.


Best answer by Mohamed Ramadan

hello @Alexis 

Since the last Commvault update, you can do this by opening the Command Center, expanding the Monitoring section, and clicking on Approvals. You'll find your request there; just click on it to approve.


Best Regards,
Mohamed Ramadan
Data Protection Specialist

View original
Did this answer your question?

3 replies

Mohamed Ramadan
Forum|alt.badge.img+9

hello @Alexis 

Since the last Commvault update, you can do this by opening the Command Center, expanding the Monitoring section, and clicking on Approvals. You'll find your request there; just click on it to approve.


Best Regards,
Mohamed Ramadan
Data Protection Specialist


Forum|alt.badge.img
  • 1 reply
  • October 22, 2024

Hello @Mohamed Ramadan

Thank you for information. How to disable this after update delete agent need to approve functions? Would you mind sharing with us?


Mohamed Ramadan
Forum|alt.badge.img+9

 hello @Ken Chan 
i am happy to help !

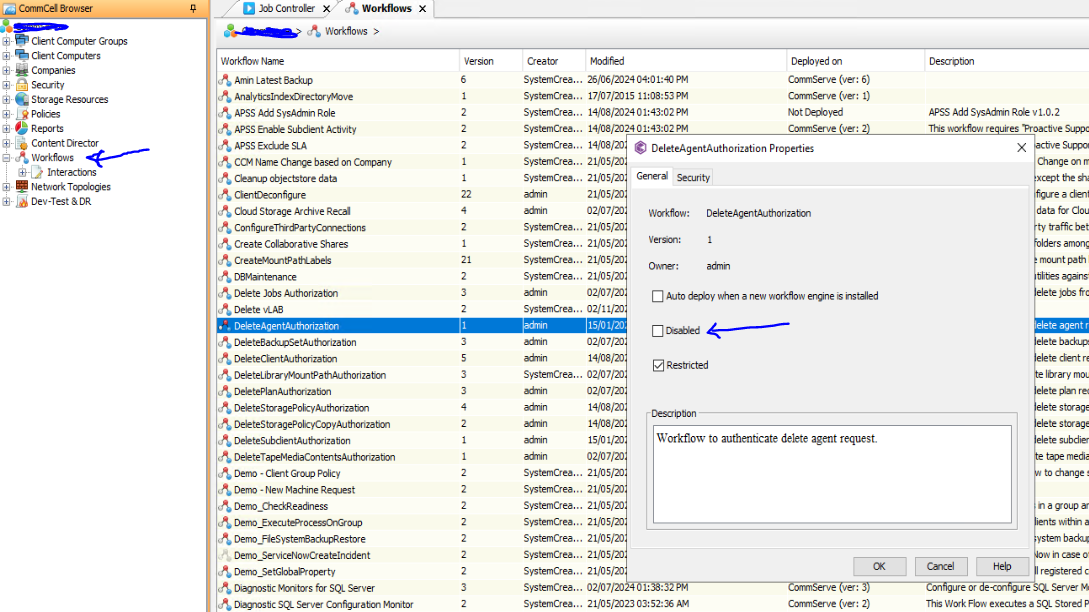
To disable the agent approval requirement you can follow these steps:

1 - Navigate to the Workflows .
2- Look for the "Delete Agent Authorization " workflow .
3- Right-click and select Properties .
4- Check the box for “Disable” and click OK. 


If you need more detailed instructions or run into any issues, feel free to ask!

Best Regards,
Mohamed Ramadan
Data Protection Specialist


Cookie policy

We use cookies to enhance and personalize your experience. If you accept you agree to our full cookie policy. Learn more about our cookies.

 
Cookie settings